JenkinsFile EXAMPLE
What is Jenkins Pipeline?
In Jenkins, a pipeline is a group of events or jobs which are interlinked with one another in a sequence.
In simple words, Jenkins Pipeline is a combination of plugins that support the integration and implementation of continuous delivery pipelines using Jenkins. A pipeline has an extensible automation server for creating simple or complex delivery pipelines "as code," via pipeline DSL (Domain-specific Language).
What is Continuous Delivery Pipelines? How it Works?
In a Jenkins pipeline, every job or event has some sort of dependency on at least one or more events.
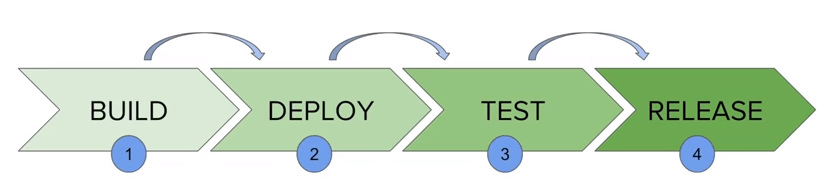
The picture above represents a continuous delivery pipeline in Jenkins. It contains a group of states called build, deploy, test and release. These events are interlinked with each other. Every state has its events, which work in a sequence called a continuous delivery pipeline.
A continuous delivery pipeline is an automated expression to display your process for getting software for version control. Thus, every change made in your software goes through a number of complex processes on its way to being released. It also involves developing the software in a reliable and repeatable manner, and progression of the built software through multiple stages of testing and deployment.
In this tutorial, you will learn
- What is Jenkins Pipeline?
- What is a JenkinsFile?
- Why Use Jenkin's Pipeline?
- Jenkins Pipeline Concepts
- Install Build Pipeline Plugin in Jenkins
- How to Create Jenkins Pipeline
- Running Jenkins pipeline
- Best Practices using Jenkins Pipeline
What is a JenkinsFile?
Jenkins pipelines can be defined using a text file called JenkinsFile. You can implement pipeline as code using JenkinsFile, and this can be defined by using a domain specific language (DSL). With JenkinsFile, you can write the steps needed for running a Jenkins pipeline.
The benefits of using JenkinsFile are:
- You can create pipelines automatically for all branches and execute pull requests with just one JenkinsFile.
- You can review your code on the pipeline
- You can audit your Jenkins pipeline
- This is the singular source for your pipeline and can be modified by multiple users.
JenkinsFile can be defined by either Web UI or with a JenkinsFile.
Declarative versus Scripted pipeline syntax:
There are two types of syntax used for defining your JenkinsFile.
- Declarative
- Scripted
Declarative:
Declarative pipeline syntax offers an easy way to create pipelines. It contains a predefined hierarchy to create Jenkins pipelines. It gives you the ability to control all aspects of a pipeline execution in a simple, straight-forward manner.
Scripted:
Scripted Jenkins pipeline runs on the Jenkins master with the help of a lightweight executor. It uses very few resources to translate the pipeline into atomic commands. Both declarative and scripted syntax are different from each other and are defined totally differently.
Why Use Jenkin's Pipeline?
Jenkins is an open continuous integration server which has the ability to support the automation of software development processes. You can create multiple automation jobs with the help of use cases, and run them as a Jenkins pipeline.
Here are the reasons why you use should use Jenkins pipeline:
- Jenkins pipeline is implemented as a code which allows multiple users to edit and execute the pipeline process.
- Pipelines are robust. So if your server undergoes an unforeseen restart, the pipeline will be automatically resumed.
- You can pause the pipeline process and make it wait to resume until there is an input from the user.
- Jenkins Pipelines support big projects. You can run multiple jobs, and even use pipelines in a loop.
Jenkins Pipeline Concepts
| Term | Description |
| Pipeline | The pipeline is a set of instructions given in the form of code for continuous delivery and consists of instructions needed for the entire build process. With pipeline, you can build, test, and deliver the application. |
| Node | The machine on which Jenkins runs is called a node. A node block is mainly used in scripted pipeline syntax. |
| Stage | A stage block contains a series of steps in a pipeline. That is, the build, test, and deploy processes all come together in a stage. Generally, a stage block is used to visualize the Jenkins pipeline process. |
| Step | A step is nothing but a single task that executes a specific process at a defined time. A pipeline involves a series of steps. |
Install Build Pipeline Plugin in Jenkins
With the build pipeline plugin, you can create a pipeline view of incoming and outgoing jobs, and create triggers which require manual intervention.
Here is how you can install the build pipeline plugin in your Jenkins:
Step 1) The settings for the plugin can be found under Manage Jenkins > Manage Plugins.

If you have already installed the plugin, it is shown under the installed tab.

Step 2) If you do not have the plugin previously installed, it shows up under the Available tab.
Once you have successfully installed the build pipeline plugin in your Jenkins, follow these steps to create your Jenkins pipeline:
How to Create Jenkins Pipeline
Once you are logged in to your Jenkins dashboard:
Step 1) Click on the "+" button on the left-hand side of your Jenkins dashboard to create a pipeline.

Step 2)
- You will be asked to give a name to the pipeline view. We shall call it "Guru99 Pipeline" for the duration of this demo.
- Select Build a pipeline view under options
- Click ok

Step 4) In the next page, you will be asked for some more details to configure your Jenkins pipeline. Just accept the default settings, and make sure you choose the first job under the settings.
Click on Apply and then OK.

This will show you the sample pipeline view of your item, as given below:

Running a pipeline build
Step 1) For running a pipeline build, you need to chain your jobs first. For this, go to your first job and click on configure.

Step 2) Now, under Build Triggers, check the Build after other projects are built option.

Thus, a chain for all your jobs has been created.
Step 3) Install the Build Pipeline view plugin if you don't have it installed already.
Step 4) Go to your Jenkins dashboard and create a view by clicking on the "+" button. Select the Build Pipeline View option and click OK.

Step 5) Under Pipeline view configuration, locate Pipeline Flow.
Under Pipeline flow, select the initial job to run. Now choose the job which has chains to other jobs, as shown in Step 1 and Step 2.

Here we have selected Guru99 Project 1 as the initial job, chained to other jobs. So, one by one, the jobs will run in the pipeline.
When the Jenkins pipeline is running, you can check its status with the help of Red and Green status symbols. Red means the pipeline has failed, while green indicates success.
In this example, we see that the button is green. Hence, the pipeline is successful.

Running Jenkins pipeline
Click on Run to run the Jenkins pipeline. It will look something like this:
In the example above, we are demonstrating a simple "helloworld.java" program. But in real time projects, you will be responsible for creating and building complex pipelines in Jenkins. See below for a sample pipeline view.
Best Practices using Jenkins Pipeline:
- Use the genuine Jenkins Pipeline
- Develop your pipeline as code
- Any non-setup work in your pipeline should occur within a stage block.
- Any material work in a pipeline must be performed within a node block.
- Don't use input within a node block.
- Never set environment variables with env global variable
- Wrap your inputs in a timeout
Pipeline Examples
The following examples are sourced from the the pipeline-examples repository on GitHub and contributed to by various members of the Jenkins project. If you are interested in contributing your own example, please consult the README in the repository.
Table of Contents
- Ansi Color Build Wrapper
- Archive Build Output Artifacts
- Artifactory Generic Upload Download
- Artifactory Gradle Build
- Artifactory Maven Build
- Configfile Provider Plugin
- External Workspace Manager
- Get Build Cause
- Gitcommit
- Gitcommit_changeset
- Ircnotify Commandline
- Jobs In Parallel
- Load From File
- Maven And Jdk Specific Version
- Parallel From Grep
- Parallel From List
- Parallel Multiple Nodes
- Push Git Repo
- Slacknotify
- Timestamper Wrapper
- Trigger Job On All Nodes
- Unstash Different Dir
Synopsis
This shows usage of a simple build wrapper, specifically the AnsiColor plugin, which adds ANSI coloring to the console output.
// This shows a simple build wrapper example, using the AnsiColor plugin.
node {
    // This displays colors using the 'xterm' ansi color map.
    ansiColor('xterm') {
        // Just some echoes to show the ANSI color.
        stage "\u001B[31mI'm Red\u001B[0m Now not"
    }
}
Synopsis
This is a simple demonstration of how to archive the build output artifacts in workspace for later use.
// This shows a simple example of how to archive the build output artifacts.
node {
    stage "Create build output"

    // Make the output directory.
    sh "mkdir -p output"

    // Write an useful file, which is needed to be archived.
    writeFile file: "output/usefulfile.txt", text: "This file is useful, need to archive it."

    // Write an useless file, which is not needed to be archived.
    writeFile file: "output/uselessfile.md", text: "This file is useless, no need to archive it."

    stage "Archive build output"

    // Archive the build output artifacts.
    archiveArtifacts artifacts: 'output/*.txt', excludes: 'output/*.md'
}
Synopsis
This is a simple demonstration of how to download dependencies, upload artifacts and publish build info to Artifactory.
Read the full documentation here.
Read the full documentation here.
node {
    git url: 'https://github.com/jfrogdev/project-examples.git'

    // Get Artifactory server instance, defined in the Artifactory Plugin administration page.
    def server = Artifactory.server "SERVER_ID"

    // Read the upload spec and upload files to Artifactory.
    def downloadSpec =
            '''{
            "files": [
                {
                    "pattern": "libs-snapshot-local/*.zip",
                    "target": "dependencies/",
                    "props": "p1=v1;p2=v2"
                }
            ]
        }'''

    def buildInfo1 = server.download spec: downloadSpec

    // Read the upload spec which was downloaded from github.
    def uploadSpec =
            '''{
            "files": [
                {
                    "pattern": "resources/Kermit.*",
                    "target": "libs-snapshot-local",
                    "props": "p1=v1;p2=v2"
                },
                {
                    "pattern": "resources/Frogger.*",
                    "target": "libs-snapshot-local"
                }
            ]
        }'''

    // Upload to Artifactory.
    def buildInfo2 = server.upload spec: uploadSpec

    // Merge the upload and download build-info objects.
    buildInfo1.append buildInfo2

    // Publish the build to Artifactory
    server.publishBuildInfo buildInfo1
}
Synopsis
This is a simple demonstration of how to run a Gradle build, that resolves dependencies, upload artifacts and publish build info to Artifactory.
Read the full documentation here.
Read the full documentation here.
node {
    // Get Artifactory server instance, defined in the Artifactory Plugin administration page.
    def server = Artifactory.server "SERVER_ID"
    // Create an Artifactory Gradle instance.
    def rtGradle = Artifactory.newGradleBuild()
    def buildInfo

    stage('Clone sources') {
        git url: 'https://github.com/jfrogdev/project-examples.git'
    }

    stage('Artifactory configuration') {
        // Tool name from Jenkins configuration
        rtGradle.tool = "Gradle-2.4"
        // Set Artifactory repositories for dependencies resolution and artifacts deployment.
        rtGradle.deployer repo:'ext-release-local', server: server
        rtGradle.resolver repo:'remote-repos', server: server
    }

    stage('Gradle build') {
        buildInfo = rtGradle.run rootDir: "gradle-examples/4/gradle-example-ci-server/", buildFile: 'build.gradle', tasks: 'clean artifactoryPublish'
    }

    stage('Publish build info') {
        server.publishBuildInfo buildInfo
    }
}
Synopsis
This is a simple demonstration of how to run a Maven build, that resolves dependencies, upload artifacts and publish build info to Artifactory.
Read the full documentation here.
Read the full documentation here.
node {
    // Get Artifactory server instance, defined in the Artifactory Plugin administration page.
    def server = Artifactory.server "SERVER_ID"
    // Create an Artifactory Maven instance.
    def rtMaven = Artifactory.newMavenBuild()
    def buildInfo

    stage('Clone sources') {
        git url: 'https://github.com/jfrogdev/project-examples.git'
    }

    stage('Artifactory configuration') {
        // Tool name from Jenkins configuration
        rtMaven.tool = "Maven-3.3.9"
        // Set Artifactory repositories for dependencies resolution and artifacts deployment.
        rtMaven.deployer releaseRepo:'libs-release-local', snapshotRepo:'libs-snapshot-local', server: server
        rtMaven.resolver releaseRepo:'libs-release', snapshotRepo:'libs-snapshot', server: server
    }

    stage('Maven build') {
        buildInfo = rtMaven.run pom: 'maven-example/pom.xml', goals: 'clean install'
    }

    stage('Publish build info') {
        server.publishBuildInfo buildInfo
    }
}
configFile Provider plugin enables provisioning of various types of configuration files. Plugin works in such a way as to make the configuration available for the entire duration of the build across all the build agents that are used to execute the build.
Common scenarios that demand the usage of configuration files:
- Provide properties that can be consumed by the build tool
- Global settings that override local settings
- Details of credentials needed to access repos
- Inputs to generate binary images that need to be tailored to specific architectures
The example shows simple usage of configFile Provider plugin and howto access it's contents.
#!groovy

node {
    stage('configFile Plugin') {

        // 'ID' refers to alpha-numeric value generated automatically by Jenkins.
        // This code snippet assumes that the config file is stored in Jenkins.

        // help to assign the ID of config file to a variable, this is optional
        // as ID can be used directly within 'configFileProvider' step too.
        def mycfg_file = '<substitute-alpha-numeric-value-cfgfille-here-within-quotes>'

        // whether referencing the config file as ID (directly) or via user-defined
        // variable, 'configFileProvider' step enables access to the config file
        // via 'name' given for the field, 'variable:'
        configFileProvider([configFile(fileId: mycfg_file, variable: 'PACKER_OPTIONS')]) {
            echo " =========== ^^^^^^^^^^^^ Reading config from pipeline script "
            sh "cat ${env.PACKER_OPTIONS}"
            echo " =========== ~~~~~~~~~~~~ ============ "

            // Access to config file opens up other possibilities like
            // passing on the configuration to an external script for other tasks, like,
            // for example, to set generic options that can be used for generating
            // binary images using packer.
            echo " =========== ^^^^^^^^^^^^ Reading config via Python... "
            sh "python build_image.py ${env.PACKER_OPTIONS}"
            echo " =========== ~~~~~~~~~~~~ ============ "
        }
    }
}
Synopsis
Shows how to allocate the same workspace on multiple nodes using the External Workspace Manager Plugin.
Prerequisites
Before using this script, you must configure several prerequisites. A starting guide may be found in the
prerequisites section, from the plugin's documentation.
prerequisites section, from the plugin's documentation.
Documentation
Additional examples can be found on the plugin's documentation page, along with all the available features.
// allocate a Disk from the Disk Pool defined in the Jenkins global config
def extWorkspace = exwsAllocate 'diskpool1'

// on a node labeled 'linux', perform code checkout and build the project
node('linux') {
    // compute complete workspace path, from current node to the allocated disk
    exws(extWorkspace) {
        // checkout code from repo
        checkout scm
        // build project, but skip running tests
        sh 'mvn clean install -DskipTests'
    }
}

// on a different node, labeled 'test', perform testing using the same workspace as previously
// at the end, if the build have passed, delete the workspace
node('test') {
    // compute complete workspace path, from current node to the allocated disk
    exws(extWorkspace) {
        try {
            // run tests in the same workspace that the project was built
            sh 'mvn test'
        } catch (e) {
            // if any exception occurs, mark the build as failed
            currentBuild.result = 'FAILURE'
            throw e
        } finally {
            // perform workspace cleanup only if the build have passed
            // if the build has failed, the workspace will be kept
            cleanWs cleanWhenFailure: false
        }
    }
}
Synopsis
Shows how to get the Cause(s) of a Pipeline build from within the Pipeline script.
Credit
Based on Stackoverflow answer at http://stackoverflow.com/questions/33587927/how-to-get-cause-in-workflow
// As of Pipeline Supporting APIs v2.22, there is a whitelisted API to access
// build causes as JSON that is available inside of the Pipeline Sandbox.

// Get all Causes for the current build
def causes = currentBuild.getBuildCauses()

// Get a specific Cause type (in this case the user who kicked off the build),
// if present.
def specificCause = currentBuild.getBuildCauses('hudson.model.Cause$UserIdCause')

// The JSON data is created by calling methods annotated with `@Exported` for
// each Cause type. See the Javadoc for specific Cause types to check exactly
// what data will be available.
// For example, for a build triggered manually by a specific user, the resulting
// JSON would be something like the following:
//
// [
//  {
//    "_class\": "hudson.model.Cause$UserIdCause",
//    "shortDescription": "Started by user anonymous",
//    "userId": "tester",
//    "userName": "anonymous"
//  }
// ]
// cf. https://javadoc.jenkins-ci.org/hudson/model/Cause.UserIdCause.html
Synopsis
Demonstrate how to expose the git_commit to a Pipeline job.
Background
The git plugin exposes some environment variables to a freestyle job that are not currently exposed to a Pipeline job. Here's how to recover that ability using a git command and Pipeline's
sh step.// These should all be performed at the point where you've // checked out your sources on the agent. A 'git' executable // must be available. // Most typical, if you're not cloning into a sub directory shortCommit = sh(returnStdout: true, script: "git log -n 1 --pretty=format:'%h'").trim()
// This should be performed at the point where you've
// checked out your sources on the agent. A 'git' executable
// must be available.
// Most typical, if you're not cloning into a sub directory
// and invoke this in the context of a directory with .git/
// Along with SHA-1 id of the commit, it will be useful to retrieve changeset associated with that commit
// This command results in output indicating several one of these and the affected files:
// Added (A), Copied (C), Deleted (D), Modified (M), Renamed (R)
commitChangeset = sh(returnStdout: true, script: 'git diff-tree --no-commit-id --name-status -r HEAD').trim()
Synopsis
Send a notification to an IRC channel
Background
The IRC protocol is simple enough that you can use a pipeline shell step and nc to send a message to an irc room. You will need to customize the script to use the actual room, server, and authentication details.
stage "notify"

//
// Modify the channel, message etc as needed.
// Some IRC servers require authentication.
// This specific example does not with the current settings on freenode.
//
node {

    sh '''
        MSG='This is the message here'
        SERVER=irc.freenode.net
        CHANNEL=#mictest
        USER=mic2234test

        (
        echo NICK $USER
        echo USER $USER 8 * : $USER
        sleep 1
        #echo PASS $USER:$MYPASSWORD
        echo "JOIN $CHANNEL"
        echo "PRIVMSG $CHANNEL" :$MSG
        echo QUIT
        ) | nc $SERVER 6667

    '''

}
This code snippet will run the same job multiple times in parallel a usecase of that is, for example, a system test or load test that requires several workers with heavy i/o or compute. it allows you to run each worker on a different machine to distribute the i/o or compute
// in this array we'll place the jobs that we wish to run
def branches = [:]

//running the job 4 times concurrently
//the dummy parameter is for preventing mutation of the parameter before the execution of the closure.
//we have to assign it outside the closure or it will run the job multiple times with the same parameter "4"
//and jenkins will unite them into a single run of the job

for (int i = 0; i < 4; i++) {
  def index = i //if we tried to use i below, it would equal 4 in each job execution.
  branches["branch${i}"] = {
//Parameters:
//param1 : an example string parameter for the triggered job.
//dummy: a parameter used to prevent triggering the job with the same parameters value.
//       this parameter has to accept a different value each time the job is triggered.
    build job: 'freestyle', parameters: [
      string(name: 'param1', value:'test_param'),
      string(name:'dummy', value: "${index}")]
  }
}
parallel branches
Synopsis
A very simple example demonstrating how the load method allows you to read in Groovy files from disk or from the web and then call the code in them.
// Methods in this file will end up as object methods on the object that load returns.
def lookAtThis(String whoAreYou) {
    echo "Look at this, ${whoAreYou}! You loaded this from another file!"
}

return this;
// If there's a call method, you can just load the file, say, as "foo", and then invoke that call method with foo(...)
def call(String whoAreYou) {
    echo "Now we're being called more magically, ${whoAreYou}, thanks to the call(...) method."
}

return this;
node {
    // Load the file 'externalMethod.groovy' from the current directory, into a variable called "externalMethod".
    def externalMethod = load("externalMethod.groovy")

    // Call the method we defined in externalMethod.
    externalMethod.lookAtThis("Steve")

    // Now load 'externalCall.groovy'.
    def externalCall = load("externalCall.groovy")

    // We can just run it with "externalCall(...)" since it has a call method.
    externalCall("Steve")
}
#!groovy
/*
   Instead of duplicating a lot of build related code in each repo include the common one from this file using the command below:

   Don't forget to put configure GITHUB_TOKEN inside Jenkins as it is a very bad idea to include it inside your code.
*/

apply from: 'https://raw.githubusercontent.com/org-name/repo-name/master/subfolder/Jenkinsfile?token=${env.GITHUB_TOKEN}'
Synopsis
An example showing how to build a standard maven project with specific versions for Maven and the JDK.
It shows how to use the
withEnv step to define the right PATH to use the tools.Caveats
- in
tool 'thetool', thethetoolstring must match a defined tool in your Jenkins installation.
// Advice: don't define M2_HOME in general. Maven will autodetect its root fine.
withEnv(["JAVA_HOME=${ tool 'jdk-1.8.0_64bits' }", "PATH+MAVEN=${tool 'maven-3.2.1'}/bin:${env.JAVA_HOME}/bin"]) {

    // Apache Maven related side notes:
    // --batch-mode : recommended in CI to inform maven to not run in interactive mode (less logs)
    // -V : strongly recommended in CI, will display the JDK and Maven versions in use.
    //      Very useful to be quickly sure the selected versions were the ones you think.
    // -U : force maven to update snapshots each time (default : once an hour, makes no sense in CI).
    // -Dsurefire.useFile=false : useful in CI. Displays test errors in the logs directly (instead of
    //                            having to crawl the workspace files to see the cause).
    sh "mvn --batch-mode -V -U -e clean deploy -Dsurefire.useFile=false"

}
Synopsis
An example showing how to search for a list of existing jobs and triggering all of them in parallel.
Caveats
- Calling other jobs is not the most idiomatic way to use the Worflow DSL, however, the chance of re-using existing jobs is always welcome under certain circumstances.
- Due to limitations in Workflow - i.e., JENKINS-26481 - it's not really possible to use Groovy closures or syntax that depends on closures, so you can't do the Groovy standard of using .collectEntries on a list and generating the steps as values for the resulting entries. You also can't use the standard Java syntax for For loops - i.e., "for (String s: strings)" - and instead have to use old school counter-based for loops.
- There is no need for the generation of the step itself to be in a separate method. I've opted to do so here to show how to return a step closure from a method.
import jenkins.model.*

// While you can't use Groovy's .collect or similar methods currently, you can
// still transform a list into a set of actual build steps to be executed in
// parallel.

def stepsForParallel = [:]

// Since this method uses grep/collect it needs to be annotated with @NonCPS
// It returns a simple string map so the workflow can be serialized
@NonCPS
def jobs(jobRegexp) {
  Jenkins.instance.getAllItems()
         .grep { it.name ==~ ~"${jobRegexp}"  }
         .collect { [ name : it.name.toString(),
                      fullName : it.fullName.toString() ] }
}

j = jobs('test-(dev|stage)-(unit|integration)')
for (int i=0; i < j.size(); i++) {
    stepsForParallel["${j[i].name}"] = transformIntoStep(j[i].fullName)
}

// Actually run the steps in parallel - parallel takes a map as an argument,
// hence the above.
parallel stepsForParallel

// Take the string and echo it.
def transformIntoStep(jobFullName) {
    // We need to wrap what we return in a Groovy closure, or else it's invoked
    // when this method is called, not when we pass it to parallel.
    // To do this, you need to wrap the code below in { }, and either return
    // that explicitly, or use { -> } syntax.
    return {
       // Job parameters can be added to this step
       build jobFullName
    }
}
Synopsis
An example showing how to take a list of objects and transform it into a map of steps to be run with the parallel command.
Caveats
- There is no need for the generation of the step itself to be in a separate method. I've opted to do so here to show how to return a step closure from a method.
// While you can't use Groovy's .collect or similar methods currently, you can
// still transform a list into a set of actual build steps to be executed in
// parallel.

// Our initial list of strings we want to echo in parallel
def stringsToEcho = ["a", "b", "c", "d"]

// The map we'll store the parallel steps in before executing them.
def stepsForParallel = stringsToEcho.collectEntries {
    ["echoing ${it}" : transformIntoStep(it)]
}

// Actually run the steps in parallel - parallel takes a map as an argument,
// hence the above.
parallel stepsForParallel

// Take the string and echo it.
def transformIntoStep(inputString) {
    // We need to wrap what we return in a Groovy closure, or else it's invoked
    // when this method is called, not when we pass it to parallel.
    // To do this, you need to wrap the code below in { }, and either return
    // that explicitly, or use { -> } syntax.
    return {
        node {
            echo inputString
        }
    }
}
Synopsis
This is a simple example showing how to succinctly parallel the same build across multiple Jenkins nodes. This is useful for e.g. building the same project on multiple OS platforms.
def labels = ['precise', 'trusty'] // labels for Jenkins node types we will build on
def builders = [:]
for (x in labels) {
    def label = x // Need to bind the label variable before the closure - can't do 'for (label in labels)'

    // Create a map to pass in to the 'parallel' step so we can fire all the builds at once
    builders[label] = {
      node(label) {
        // build steps that should happen on all nodes go here
      }
    }
}

parallel builders
Synopsis
This demonstrates how to push a tag (or branch, etc) to a remote Git repository from within a Pipeline job. The authentication step may vary between projects. This example illustrates injected credentials and also username / password authentication.
Note
If you inject a credential associated with your Git repo, use the Snippet Generator to select the plain
Git option and it will return a snippet with this gem:java stage('Checkout') { git branch: 'lts-1.532', credentialsId: '82aa2d26-ef4b-4a6a-a05f-2e1090b9ce17', url: 'git@github.com:jenkinsci/maven-plugin.git' } This is not ideal - there is an open JIRA, https://issues.jenkins-ci.org/browse/JENKINS-28335, for getting the GitPublisher Jenkins functionality working with Pipeline.Credit
Based on Stackoverflow answer at http://stackoverflow.com/questions/33570075/tag-a-repo-from-a-jenkins-workflow-script Injected credentials gist at https://gist.github.com/blaisep/eb8aa720b06eff4f095e4b64326961b5#file-jenkins-pipeline-git-cred-md
// This is currently the best way to push a tag (or a branch, etc) from a
// Pipeline job. It's not ideal - https://issues.jenkins-ci.org/browse/JENKINS-28335
// is an open JIRA for getting the GitPublisher Jenkins functionality working
// with Pipeline.

// credentialsId here is the credentials you have set up in Jenkins for pushing
// to that repository using username and password.
withCredentials([usernamePassword(credentialsId: 'git-pass-credentials-ID', passwordVariable: 'GIT_PASSWORD', usernameVariable: 'GIT_USERNAME')]) {
    sh("git tag -a some_tag -m 'Jenkins'")
    sh('git push https://${GIT_USERNAME}:${GIT_PASSWORD}@<REPO> --tags')
}

// For SSH private key authentication, try the sshagent step from the SSH Agent plugin.
sshagent (credentials: ['git-ssh-credentials-ID']) {
    sh("git tag -a some_tag -m 'Jenkins'")
    sh('git push <REPO> --tags')
}
Synopsis
Use a slack webhook to send an arbitrary message.
Background
Using a combination of groovy and curl from shell, send a message to slack for notifications. Some of the more friendly groovy http libs like HTTPBuilder are not easily available. However, we can use groovy's built in json handling to build up the request and ship it to a command line curl easily enough.
This will require that you configure a webhook integration in slack (not the Jenkins specific configuration.)
import groovy.json.JsonOutput
// Add whichever params you think you'd most want to have
// replace the slackURL below with the hook url provided by
// slack when you configure the webhook
def notifySlack(text, channel) {
    def slackURL = 'https://hooks.slack.com/services/xxxxxxx/yyyyyyyy/zzzzzzzzzz'
    def payload = JsonOutput.toJson([text      : text,
                                     channel   : channel,
                                     username  : "jenkins",
                                     icon_emoji: ":jenkins:"])
    sh "curl -X POST --data-urlencode \'payload=${payload}\' ${slackURL}"
}
Synopsis
This shows usage of a simple build wrapper, specifically the Timestamper plugin, which adds timestamps to the console output.
// This shows a simple build wrapper example, using the Timestamper plugin.
node {
    // Adds timestamps to the output logged by steps inside the wrapper.
    timestamps {
        // Just some echoes to show the timestamps.
        stage "First echo"
        echo "Hey, look, I'm echoing with a timestamp!"

        // A sleep to make sure we actually get a real difference!
        stage "Sleeping"
        sleep 30

        // And a final echo to show the time when we wrap up.
        stage "Second echo"
        echo "Wonder what time it is now?"
    }
}
Synopsis
The example shows how to trigger jobs on all Jenkins nodes from Pipeline.
Summary: * The script uses NodeLabel Parameter plugin to pass the job name to the payload job. * Node list retrieval is being performed using Jenkins API, so it will require script approvals in the Sandbox mode
// The script triggers PayloadJob on every node.
// It uses Node and Label Parameter plugin to pass the job name to the payload job.
// The code will require approval of several Jenkins classes in the Script Security mode
def branches = [:]
def names = nodeNames()
for (int i=0; i<names.size(); ++i) {
  def nodeName = names[i];
  // Into each branch we put the pipeline code we want to execute
  branches["node_" + nodeName] = {
    node(nodeName) {
      echo "Triggering on " + nodeName
      build job: 'PayloadJob', parameters: [
              new org.jvnet.jenkins.plugins.nodelabelparameter.NodeParameterValue
                  ("TARGET_NODE", "description", nodeName)
          ]
    }
  }
}

// Now we trigger all branches
parallel branches

// This method collects a list of Node names from the current Jenkins instance
@NonCPS
def nodeNames() {
  return jenkins.model.Jenkins.instance.nodes.collect { node -> node.name }
}
Synopsis
This is a simple demonstration of how to unstash to a different directory than the root directory, so that you can make sure not to overwrite directories or files, etc.
// First we'll generate a text file in a subdirectory on one node and stash it.
stage "first step on first node"

// Run on a node with the "first-node" label.
node('first-node') {
    // Make the output directory.
    sh "mkdir -p output"

    // Write a text file there.
    writeFile file: "output/somefile", text: "Hey look, some text."

    // Stash that directory and file.
    // Note that the includes could be "output/", "output/*" as below, or even
    // "output/**/*" - it all works out basically the same.
    stash name: "first-stash", includes: "output/*"
}

// Next, we'll make a new directory on a second node, and unstash the original
// into that new directory, rather than into the root of the build.
stage "second step on second node"

// Run on a node with the "second-node" label.
node('second-node') {
    // Run the unstash from within that directory!
    dir("first-stash") {
        unstash "first-stash"
    }

    // Look, no output directory under the root!
    // pwd() outputs the current directory Pipeline is running in.
    sh "ls -la ${pwd()}"

    // And look, output directory is there under first-stash!
    sh "ls -la ${pwd()}/first-stash"
}
--------------*******************************************************------------------
Using a Jenkinsfile
Table of ContentsThis section builds on the information covered in Getting started with Pipelineand introduces more useful steps, common patterns, and demonstrates some non-trivialJenkinsfileexamples.Creating aJenkinsfile, which is checked into source control [1], provides a number of immediate benefits:
Jenkinsfile, though it’s generally considered a best practice to create aJenkinsfileand check the file into the source control repository.Creating a Jenkinsfile
As discussed in the Defining a Pipeline in SCM, aJenkinsfileis a text file that contains the definition of a Jenkins Pipeline and is checked into source control. Consider the following Pipeline which implements a basic three-stage continuous delivery pipeline.Jenkinsfile (Declarative Pipeline)pipeline { agent any stages { stage('Build') { steps { echo 'Building..' } } stage('Test') { steps { echo 'Testing..' } } stage('Deploy') { steps { echo 'Deploying....' } } } }Not all Pipelines will have these same three stages, but it is a good starting point to define them for most projects. The sections below will demonstrate the creation and execution of a simple Pipeline in a test installation of Jenkins.
Jenkinsfilein the root directory of the project.The Declarative Pipeline example above contains the minimum necessary structure to implement a continuous delivery pipeline. The agent directive, which is required, instructs Jenkins to allocate an executor and workspace for the Pipeline. Without anagentdirective, not only is the Declarative Pipeline not valid, it would not be capable of doing any work! By default theagentdirective ensures that the source repository is checked out and made available for steps in the subsequent stages`The stages directive, and steps directives are also required for a valid Declarative Pipeline as they instruct Jenkins what to execute and in which stage it should be executed.For more advanced usage with Scripted Pipeline, the example abovenodeis a crucial first step as it allocates an executor and workspace for the Pipeline. In essence, withoutnode, a Pipeline cannot do any work! From withinnode, the first order of business will be to checkout the source code for this project. Since theJenkinsfileis being pulled directly from source control, Pipeline provides a quick and easy way to access the right revision of the source codeJenkinsfile (Scripted Pipeline)node { checkout scm /* .. snip .. */ }
The checkoutstep will checkout code from source control;scmis a special variable which instructs thecheckoutstep to clone the specific revision which triggered this Pipeline run.Build
For many projects the beginning of "work" in the Pipeline would be the "build" stage. Typically this stage of the Pipeline will be where source code is assembled, compiled, or packaged. TheJenkinsfileis not a replacement for an existing build tool such as GNU/Make, Maven, Gradle, etc, but rather can be viewed as a glue layer to bind the multiple phases of a project’s development lifecycle (build, test, deploy, etc) together.Jenkins has a number of plugins for invoking practically any build tool in general use, but this example will simply invokemakefrom a shell step (sh). Theshstep assumes the system is Unix/Linux-based, for Windows-based systems thebatcould be used instead.Jenkinsfile (Declarative Pipeline)pipeline { agent any stages { stage('Build') { steps { sh 'make' archiveArtifacts artifacts: '**/target/*.jar', fingerprint: true } } } }
The shstep invokes themakecommand and will only continue if a zero exit code is returned by the command. Any non-zero exit code will fail the Pipeline.archiveArtifactscaptures the files built matching the include pattern (**/target/*.jar) and saves them to the Jenkins master for later retrieval.
Test
Running automated tests is a crucial component of any successful continuous delivery process. As such, Jenkins has a number of test recording, reporting, and visualization facilities provided by a number of plugins. At a fundamental level, when there are test failures, it is useful to have Jenkins record the failures for reporting and visualization in the web UI. The example below uses thejunitstep, provided by the JUnit plugin.In the example below, if tests fail, the Pipeline is marked "unstable", as denoted by a yellow ball in the web UI. Based on the recorded test reports, Jenkins can also provide historical trend analysis and visualization.Jenkinsfile (Declarative Pipeline)pipeline { agent any stages { stage('Test') { steps { /* `make check` returns non-zero on test failures, * using `true` to allow the Pipeline to continue nonetheless */ sh 'make check || true' junit '**/target/*.xml' } } } }
Using an inline shell conditional ( sh 'make check || true') ensures that theshstep always sees a zero exit code, giving thejunitstep the opportunity to capture and process the test reports. Alternative approaches to this are covered in more detail in the Handling failure section below.junitcaptures and associates the JUnit XML files matching the inclusion pattern (**/target/*.xml).Deploy
Deployment can imply a variety of steps, depending on the project or organization requirements, and may be anything from publishing built artifacts to an Artifactory server, to pushing code to a production system.At this stage of the example Pipeline, both the "Build" and "Test" stages have successfully executed. In essence, the "Deploy" stage will only execute assuming previous stages completed successfully, otherwise the Pipeline would have exited early.Jenkinsfile (Declarative Pipeline)pipeline { agent any stages { stage('Deploy') { when { expression { currentBuild.result == null || currentBuild.result == 'SUCCESS' } } steps { sh 'make publish' } } } }
Accessing the currentBuild.resultvariable allows the Pipeline to determine if there were any test failures. In which case, the value would beUNSTABLE.Assuming everything has executed successfully in the example Jenkins Pipeline, each successful Pipeline run will have associated build artifacts archived, test results reported upon and the full console output all in Jenkins.A Scripted Pipeline can include conditional tests (shown above), loops, try/catch/finally blocks and even functions. The next section will cover this advanced Scripted Pipeline syntax in more detail.Working with your Jenkinsfile
The following sections provide details about handling:
JenkinsfileandString interpolation
Jenkins Pipeline uses rules identical to Groovy for string interpolation. Groovy’s String interpolation support can be confusing to many newcomers to the language. While Groovy supports declaring a string with either single quotes, or double quotes, for example:def singlyQuoted = 'Hello' def doublyQuoted = "World"Only the latter string will support the dollar-sign ($) based string interpolation, for example:def username = 'Jenkins' echo 'Hello Mr. ${username}' echo "I said, Hello Mr. ${username}"Would result in:Hello Mr. ${username} I said, Hello Mr. JenkinsUnderstanding how to use string interpolation is vital for using some of Pipeline’s more advanced features.Using environment variables
Jenkins Pipeline exposes environment variables via the global variableenv, which is available from anywhere within aJenkinsfile. The full list of environment variables accessible from within Jenkins Pipeline is documented at localhost:8080/pipeline-syntax/globals#env, assuming a Jenkins master is running onlocalhost:8080, and includes:
- BUILD_ID
- JOB_NAME
- JENKINS_URL
pipeline { agent any stages { stage('Example') { steps { echo "Running ${env.BUILD_ID} on ${env.JENKINS_URL}" } } } }Setting environment variables
Setting an environment variable within a Jenkins Pipeline is accomplished differently depending on whether Declarative or Scripted Pipeline is used.Declarative Pipeline supports an environment directive, whereas users of Scripted Pipeline must use thewithEnvstep.Jenkinsfile (Declarative Pipeline)pipeline { agent any environment { CC = 'clang' } stages { stage('Example') { environment { DEBUG_FLAGS = '-g' } steps { sh 'printenv' } } } }
An environmentdirective used in the top-levelpipelineblock will apply to all steps within the Pipeline.An environmentdirective defined within astagewill only apply the given environment variables to steps within thestage.Setting environment variables dynamically
In the case where environment variable need to be set dynamically at run time this can be done with the use of a shell scripts (sh), Windows Batch Script (bat) or PowerShell Script (powershell). Each script can eitherreturnStatusorreturnStdout. More information on scripts.Below is an example in a declarative pipeline usingsh(shell) with bothreturnStatusandreturnStdout.Jenkinsfile (Declarative Pipeline)pipeline { agent any environment { // Using returnStdout CC = """${sh( returnStdout: true, script: 'echo "clang"' )}""" // Using returnStatus EXIT_STATUS = """${sh( returnStatus: true, script: 'exit 1' )}""" } stages { stage('Example') { environment { DEBUG_FLAGS = '-g' } steps { sh 'printenv' } } } }
An agentmust be set at the top level of the pipeline. This will fail if agent is set asagent none.When using returnStdouta trailing whitespace will be append to the returned string. Use.trim()to remove this.Handling credentials
Credentials configured in Jenkins can be handled in Pipelines for immediate use. Read more about using credentials in Jenkins on the Using credentials page.For secret text, usernames and passwords, and secret files
Jenkins' declarative Pipeline syntax has thecredentials()helper method (used within theenvironmentdirective) which supportssecret text, username and password, as well as secret file credentials. If you want to handle other types of credentials, refer to the For other credential types section (below).Secret text
The following Pipeline code shows an example of how to create a Pipeline using environment variables for secret text credentials.In this example, two secret text credentials are assigned to separate environment variables to access Amazon Web Services (AWS). These credentials would have been configured in Jenkins with their respective credential IDsjenkins-aws-secret-key-idandjenkins-aws-secret-access-key.Jenkinsfile (Declarative Pipeline)pipeline { agent { // Define agent details here } environment { AWS_ACCESS_KEY_ID = credentials('jenkins-aws-secret-key-id') AWS_SECRET_ACCESS_KEY = credentials('jenkins-aws-secret-access-key') } stages { stage('Example stage 1') { steps { // } } stage('Example stage 2') { steps { // } } } }
You can reference the two credential environment variables (defined in this Pipeline’s environmentdirective), within this stage’s steps using the syntax$AWS_ACCESS_KEY_IDand$AWS_SECRET_ACCESS_KEY. For example, here you can authenticate to AWS using the secret text credentials assigned to these credential variables. To maintain the security and anonymity of these credentials, if the job displays the value of these credential variables from within the Pipeline (e.g.echo $AWS_SECRET_ACCESS_KEY), Jenkins only returns the value “****” to reduce the risk of secret information being disclosed to the console output and any logs. Any sensitive information in credential IDs themselves (such as usernames) are also returned as “****” in the Pipeline run’s output. This only reduces the risk of accidental exposure. It does not prevent a malicious user from capturing the credential value by other means. A Pipeline that uses credentials can also disclose those credentials. Don’t allow untrusted Pipeline jobs to use trusted credentials.In this Pipeline example, the credentials assigned to the two AWS_…environment variables are scoped globally for the entire Pipeline, so these credential variables could also be used in this stage’s steps. If, however, theenvironmentdirective in this Pipeline were moved to a specific stage (as is the case in the Usernames and passwords Pipeline example below), then theseAWS_…environment variables would only be scoped to the steps in that stage.Usernames and passwords
The following Pipeline code snippets show an example of how to create a Pipeline using environment variables for username and password credentials.In this example, username and password credentials are assigned to environment variables to access a Bitbucket repository in a common account or team for your organization; these credentials would have been configured in Jenkins with the credential IDjenkins-bitbucket-common-creds.When setting the credential environment variable in theenvironmentdirective:environment { BITBUCKET_COMMON_CREDS = credentials('jenkins-bitbucket-common-creds') }this actually sets the following three environment variables:
BITBUCKET_COMMON_CREDS- contains a username and a password separated by a colon in the formatusername:password.BITBUCKET_COMMON_CREDS_USR- an additional variable containing the username component only.BITBUCKET_COMMON_CREDS_PSW- an additional variable containing the password component only.
credentials()method (above) will always be appended with_USRand_PSW(i.e. in the format of an underscore followed by three capital letters).The following code snippet shows the example Pipeline in its entirety:Jenkinsfile (Declarative Pipeline)pipeline { agent { // Define agent details here } stages { stage('Example stage 1') { environment { BITBUCKET_COMMON_CREDS = credentials('jenkins-bitbucket-common-creds') } steps { // } } stage('Example stage 2') { steps { // } } } }
The following credential environment variables (defined in this Pipeline’s environmentdirective) are available within this stage’s steps and can be referenced using the syntax:
$BITBUCKET_COMMON_CREDS$BITBUCKET_COMMON_CREDS_USR$BITBUCKET_COMMON_CREDS_PSWFor example, here you can authenticate to Bitbucket with the username and password assigned to these credential variables. To maintain the security and anonymity of these credentials, if the job displays the value of these credential variables from within the Pipeline the same behavior described in the Secret text example above applies to these username and password credential variable types too. This only reduces the risk of accidental exposure. It does not prevent a malicious user from capturing the credential value by other means. A Pipeline that uses credentials can also disclose those credentials. Don’t allow untrusted Pipeline jobs to use trusted credentials.In this Pipeline example, the credentials assigned to the three COMMON_BITBUCKET_CREDS…environment variables are scoped only toExample stage 1, so these credential variables are not available for use in thisExample stage 2stage’s steps. If, however, theenvironmentdirective in this Pipeline were moved immediately within thepipelineblock (as is the case in the Secret textPipeline example above), then theseCOMMON_BITBUCKET_CREDS…environment variables would be scoped globally and could be used in any stage’s steps.Secret files
As far as Pipelines are concerned, secret files are handled in exactly the same manner as secret text (above).Essentially, the only difference between secret text and secret file credentials are that for secret text, the credential itself is entered directly into Jenkins whereas for a secret file, the credential is originally stored in a file which is then uploaded to Jenkins.Unlike secret text, secret files cater for credentials that are:
For other credential types
If you need to set credentials in a Pipeline for anything other than secret text, usernames and passwords, or secret files (above) - i.e SSH keys or certificates, then use Jenkins' Snippet Generator feature, which you can access through Jenkins' classic UI.To access the Snippet Generator for your Pipeline project/item:
withCredentials( … ) { … }Pipeline step snippet for the credentials you specified, which you can then copy and paste into your Declarative or Scripted Pipeline code. Notes:
withCredentials( … ) { … }Pipeline step, see Combining credentials in one step (below) for details.SSH User Private Key examplewithCredentials(bindings: [sshUserPrivateKey(credentialsId: 'jenkins-ssh-key-for-abc', \ keyFileVariable: 'SSH_KEY_FOR_ABC', \ passphraseVariable: '', \ usernameVariable: '')]) { // some block }The optionalpassphraseVariableandusernameVariabledefinitions can be deleted in your final Pipeline code.Certificate examplewithCredentials(bindings: [certificate(aliasVariable: '', \ credentialsId: 'jenkins-certificate-for-xyz', \ keystoreVariable: 'CERTIFICATE_FOR_XYZ', \ passwordVariable: 'XYZ-CERTIFICATE-PASSWORD')]) { // some block }The optionalaliasVariableandpasswordVariablevariable definitions can be deleted in your final Pipeline code.The following code snippet shows an example Pipeline in its entirety, which implements the SSH User Private Key and Certificatesnippets above:Jenkinsfile (Declarative Pipeline)pipeline { agent { // define agent details } stages { stage('Example stage 1') { steps { withCredentials(bindings: [sshUserPrivateKey(credentialsId: 'jenkins-ssh-key-for-abc', \ keyFileVariable: 'SSH_KEY_FOR_ABC')]) { // } withCredentials(bindings: [certificate(credentialsId: 'jenkins-certificate-for-xyz', \ keystoreVariable: 'CERTIFICATE_FOR_XYZ', \ passwordVariable: 'XYZ-CERTIFICATE-PASSWORD')]) { // } } } stage('Example stage 2') { steps { // } } } }
Within this step, you can reference the credential environment variable with the syntax $SSH_KEY_FOR_ABC. For example, here you can authenticate to the ABC application with its configured SSH public/private key pair credentials, whose SSH User Private Key file is assigned to$SSH_KEY_FOR_ABC.Within this step, you can reference the credential environment variable with the syntax $CERTIFICATE_FOR_XYZand$XYZ-CERTIFICATE-PASSWORD. For example, here you can authenticate to the XYZ application with its configured certificate credentials, whose Certificate's keystore file and password are assigned to the variables$CERTIFICATE_FOR_XYZand$XYZ-CERTIFICATE-PASSWORD, respectively.In this Pipeline example, the credentials assigned to the $SSH_KEY_FOR_ABC,$CERTIFICATE_FOR_XYZand$XYZ-CERTIFICATE-PASSWORDenvironment variables are scoped only within their respectivewithCredentials( … ) { … }steps, so these credential variables are not available for use in thisExample stage 2stage’s steps.To maintain the security and anonymity of these credentials, if you attempt to retrieve the value of these credential variables from within thesewithCredentials( … ) { … }steps, the same behavior described in the Secret text example (above) applies to these SSH public/private key pair credential and certificate variable types too. This only reduces the risk of accidental exposure. It does not prevent a malicious user from capturing the credential value by other means. A Pipeline that uses credentials can also disclose those credentials. Don’t allow untrusted Pipeline jobs to use trusted credentials.
withCredentials( … ) { … }step for your Pipeline (like the examples above), using the Snippet Generator is recommended to avoid specifying credentials that are out of scope for this Pipeline project/item, which when run, will make the step fail.withCredentials( … ) { … }steps to handle secret text, usernames and passwords and secret files. However, if you only need to handle these types of credentials, it is recommended you use the relevant procedure described in the section above for improved Pipeline code readability.script(the implicit parameter tosh) in Groovy above. The single-quotes will cause the secret to be expanded by the shell as an environment variable. The double-quotes are potentially less secure as the secret is interpolated by Groovy, and so typical operating system process listings (as well as Blue Ocean, and the pipeline steps tree in the classic UI) will accidentally disclose it :node { withCredentials([string(credentialsId: 'mytoken', variable: 'TOKEN')]) { sh /* WRONG! */ """ set +x curl -H 'Token: $TOKEN' https://some.api/ """ sh /* CORRECT */ ''' set +x curl -H 'Token: $TOKEN' https://some.api/ ''' } }Combining credentials in one step
Using the Snippet Generator, you can make multiple credentials available within a singlewithCredentials( … ) { … }step by doing the following:
withCredentials( … ) { … }step from the dropdown list.withCredentials( … ) { … }step.withCredentials( … ) { … }step snippet.Handling parameters
Declarative Pipeline supports parameters out-of-the-box, allowing the Pipeline to accept user-specified parameters at runtime via the parameters directive. Configuring parameters with Scripted Pipeline is done with thepropertiesstep, which can be found in the Snippet Generator.If you configured your pipeline to accept parameters using the Build with Parameters option, those parameters are accessible as members of theparamsvariable.Assuming that a String parameter named "Greeting" has been configuring in theJenkinsfile, it can access that parameter via${params.Greeting}:Jenkinsfile (Declarative Pipeline)pipeline { agent any parameters { string(name: 'Greeting', defaultValue: 'Hello', description: 'How should I greet the world?') } stages { stage('Example') { steps { echo "${params.Greeting} World!" } } } }Handling failure
Declarative Pipeline supports robust failure handling by default via its post section which allows declaring a number of different "post conditions" such as:always,unstable,success,failure, andchanged. The Pipeline Syntax section provides more detail on how to use the various post conditions.Jenkinsfile (Declarative Pipeline)pipeline { agent any stages { stage('Test') { steps { sh 'make check' } } } post { always { junit '**/target/*.xml' } failure { mail to: team@example.com, subject: 'The Pipeline failed :(' } } }Scripted Pipeline however relies on Groovy’s built-intry/catch/finallysemantics for handling failures during execution of the Pipeline.In the Test example above, theshstep was modified to never return a non-zero exit code (sh 'make check || true'). This approach, while valid, means the following stages need to checkcurrentBuild.resultto know if there has been a test failure or not.An alternative way of handling this, which preserves the early-exit behavior of failures in Pipeline, while still givingjunitthe chance to capture test reports, is to use a series oftry/finallyblocks:Using multiple agents
In all the previous examples, only a single agent has been used. This means Jenkins will allocate an executor wherever one is available, regardless of how it is labeled or configured. Not only can this behavior be overridden, but Pipeline allows utilizing multiple agents in the Jenkins environment from within the sameJenkinsfile, which can helpful for more advanced use-cases such as executing builds/tests across multiple platforms.In the example below, the "Build" stage will be performed on one agent and the built results will be reused on two subsequent agents, labelled "linux" and "windows" respectively, during the "Test" stage.Jenkinsfile (Declarative Pipeline)pipeline { agent none stages { stage('Build') { agent any steps { checkout scm sh 'make' stash includes: '**/target/*.jar', name: 'app' } } stage('Test on Linux') { agent { label 'linux' } steps { unstash 'app' sh 'make check' } post { always { junit '**/target/*.xml' } } } stage('Test on Windows') { agent { label 'windows' } steps { unstash 'app' bat 'make check' } post { always { junit '**/target/*.xml' } } } } }
The stashstep allows capturing files matching an inclusion pattern (**/target/*.jar) for reuse within the same Pipeline. Once the Pipeline has completed its execution, stashed files are deleted from the Jenkins master.The parameter in agent/nodeallows for any valid Jenkins label expression. Consult the Pipeline Syntax section for more details.unstashwill retrieve the named "stash" from the Jenkins master into the Pipeline’s current workspace.The batscript allows for executing batch scripts on Windows-based platforms.Optional step arguments
Pipeline follows the Groovy language convention of allowing parentheses to be omitted around method arguments.Many Pipeline steps also use the named-parameter syntax as a shorthand for creating a Map in Groovy, which uses the syntax[key1: value1, key2: value2]. Making statements like the following functionally equivalent:git url: 'git://example.com/amazing-project.git', branch: 'master' git([url: 'git://example.com/amazing-project.git', branch: 'master'])For convenience, when calling steps taking only one parameter (or only one mandatory parameter), the parameter name may be omitted, for example:sh 'echo hello' /* short form */ sh([script: 'echo hello']) /* long form */Advanced Scripted Pipeline
Scripted Pipeline is a domain-specific language [3] based on Groovy, most Groovy syntax can be used in Scripted Pipeline without modification.Parallel execution
The example in the section above runs tests across two different platforms in a linear series. In practice, if themake checkexecution takes 30 minutes to complete, the "Test" stage would now take 60 minutes to complete!Fortunately, Pipeline has built-in functionality for executing portions of Scripted Pipeline in parallel, implemented in the aptly namedparallelstep.Refactoring the example above to use theparallelstep:Jenkinsfile (Scripted Pipeline)stage('Build') { /* .. snip .. */ } stage('Test') { parallel linux: { node('linux') { checkout scm try { unstash 'app' sh 'make check' } finally { junit '**/target/*.xml' } } }, windows: { node('windows') { /* .. snip .. */ } } }Instead of executing the tests on the "linux" and "windows" labelled nodes in series, they will now execute in parallel assuming the requisite capacity exists in the Jenkins environment.
No comments:
Post a Comment