What Are Microservices?
Microservices are a form of service-oriented architecture style (one of the most important skills for Java developers) wherein applications are built as a collection of different smaller services rather than one whole app. Instead of a monolithic app, you have several independent applications that can run on their own and may be created using different coding or programming languages. Big and complicated applications can be made up of simpler and independent programs that are executable by themselves. These smaller programs are grouped together to deliver all the functionalities of the big, monolithic app.
Microservices captures your business scenario, answering the question “What problem are you trying to solve?” It is usually developed by an engineering team with only a few members and can be written in any programming language as well as utilize any framework. Each of the involved programs is independently versioned, executed, and scaled. These microservices can interact with other microservices and can have unique URLs or names while being always available and consistent even when failures are experienced.
What Are the Benefits of Microservices?
There are several benefits to using microservices. For one, because these smaller applications are not dependent on the same coding language, the developers can use the programming language that they are most familiar with. That helps developers come up with a program faster with lower costs and fewer bugs. The agility and low costs can also come from being able to reuse these smaller programs on other projects, making it more efficient.
Examples of Microservices Frameworks for Java
There are several microservices frameworks that you can use for developing for Java. Some of these are:
- Spring Boot: This is probably the best Java microservices framework that works on top of languages for Inversion of Control, Aspect Oriented Programming, and others.
- Jersey: This open source framework supports JAX-RS APIs in Java is very easy to use.
- Swagger: Helps you in documenting API as well as gives you a development portal, which allows users to test your APIs.
Others that you can consider include: Dropwizard, Ninja Web Framework, Play Framework, RestExpress, Restlet, Restx, and Spark Framework.
How to Create Using DropWizard
DropWizard pulls together mature and stable Java libraries in lightweight packages that you can use for your own applications. It uses Jetty for HTTP, Jersey for REST, and Jackson for JSON, along with Metrics, Guava, Logback, Hibernate Validator, Apache HttpClient, Liquibase, Mustache, Joda Time, and Freemarker.
You can setup Dropwizard application using Maven. How?
In your POM, add in a dropwizard.version property using the latest version of DropWizard.
This will set up a Maven project for you. From here, you can create a configuration class, an application class, a representation class, a resource class, or a health check, and you can also build Fat JARS, then run your application.
Sample code:
Microservices With Spring Boot
Spring Boot gives you Java application to use with your own apps via an embedded server. It uses Tomcat, so you do not have to use Java EE containers. A sample Spring Boot tutorial is at this link.
You can find all Spring Boot projects here, and you will realize that Spring Boot has all the infrastructures that your applications need. It does not matter if you are writing apps for security, configuration, or big data; there is a Spring Boot project for it.
Spring Boot projects include:
- Spring IO Platform: Enterprise grade distribution for versioned applications.
- Spring Framework: For transaction management, dependency injection, data access, messaging, and web apps.
- Spring Cloud: For distributed systems and used for building or deploying your microservices.
- Spring Data: For microservices that are related to data access, be it map-reduce, relational or non-relational.
- Spring Batch: For high levels of batch operations.
- Spring Security: For authorization and authentication support.
- Spring REST Docs: For documenting RESTful services.
- Spring Social: For connecting to social media APIs.
- Spring Mobile: For mobile Web apps.
Sample code:
Jersey
Jersey RESTful framework is open source, and it is based on JAX-RS specification. Jersey’s applications can extend existing JAX-RS implementations and add features and utilities that would make RESTful services simpler, as well as making client development easier.
The best thing about Jersey is that it has great documentation that is filled with examples. It is also fast and has extremely easy routing.
The documentation on how to get started with Jersey is at this link, while more documentation can be found here.
A sample code that you can try:
Jersey is very easy to use with other libraries, such as Netty or Grizzly, and it supports asynchronous connections. It does not need servlet containers. It does, however, have an unpolished dependency injection implementation.
Play Framework
Play Framework gives you an easier way to build, create and deploy Web applications using Scala and Java. Play Framework is ideal for RESTful application that requires you to handle remote calls in parallel. It is also very modular and supports async. Play Framework also has one of the biggest communities out of all microservices frameworks.
Sample code you can try:
Restlet
Restlet helps developers create fast and scalable Web APIs that adheres to the RESTful architecture pattern. It has good routing and filtering, and available for Java SE/EE, OSGi, Google AppEngine (part of Google Compute), Android, and other major platforms.
Restlet comes with a steep learning curve that is made worse by a closed community, but you can probably get help from people at StackOverflow.
Sample code:
Additional Resources and Tutorials on Microservices
For further reading and information on microservices, including some helpful tutorials, visit the following resources:
- An Introduction to Microservices, Part 1
- Build an API for microservices in 5 minutes
- Microservices Tutorials
- Microservice Architecture – A Quick Guide
- Introduction to Microservices
Microservices with Spring
Microservices allow large systems to be built up from a number of collaborating components. It does at the process level what Spring has always done at the component level: loosely coupled processes instead of loosely coupled components.
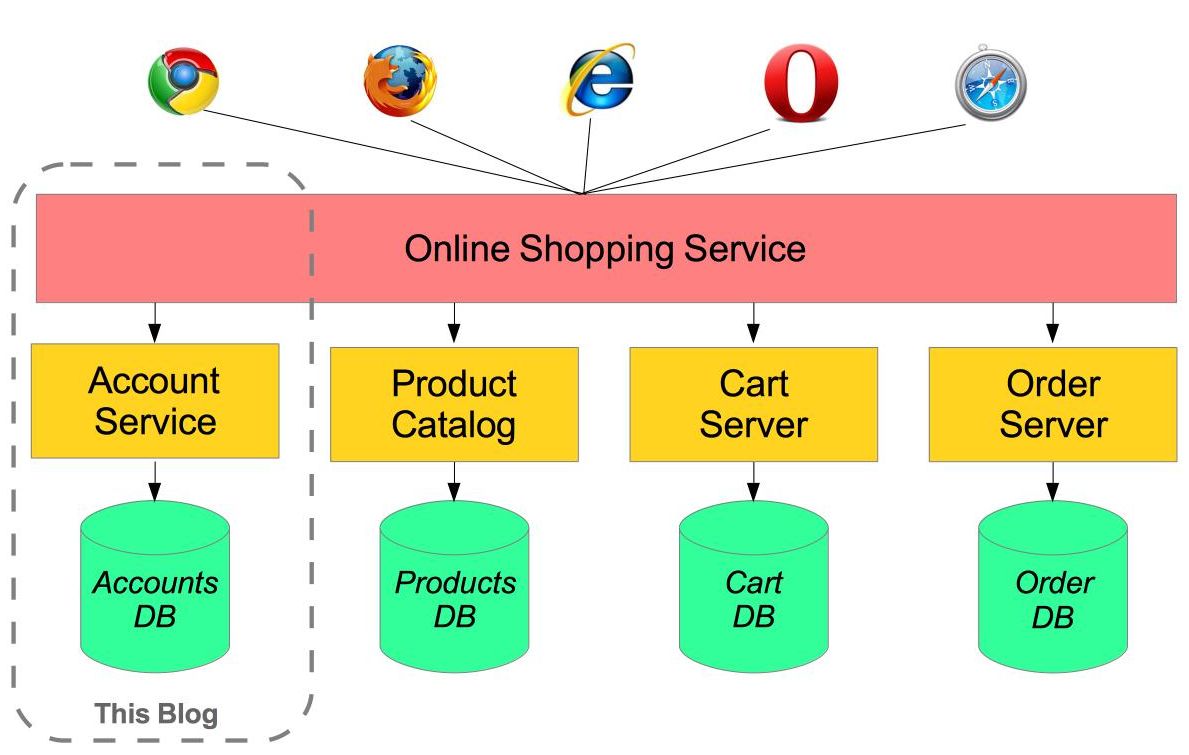
For example imagine an online shop with separate microservices for user-accounts, product-catalog order-processing and shopping carts:
Inevitably there are a number of moving parts that you have to setup and configure to build such a system. How to get them working together is not obvious - you need to have good familiarity with Spring Boot since Spring Cloud leverages it heavily, several Netflix or other OSS projects are required and, of course, there is some Spring configuration “magic”!
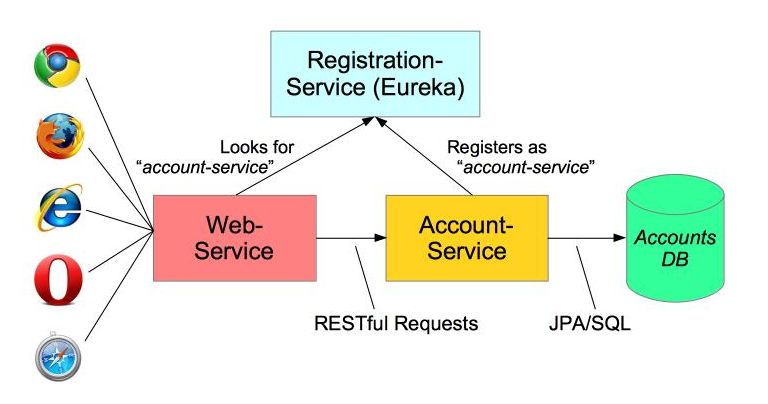
In this article I aim to clarify how things work by building the simplest possible system step-by-step. Therefore, I will only implement a small part of the big system - the user account service.
The Web-Application will make requests to the Account-Servicemicroservice using a RESTful API. We will also need to add a discovery service – so the other processes can find each other.
The code for this application is here: https://github.com/paulc4/microservices-demo.
The description of how it works is deliberately detailed. Impatient readers may prefer to simply look at the code. Note that it contains three microservices in a single project.
Follow-Up 1: Other Resources
This article only discusses a minimal system. For more information, you might like to read Josh Long’s blog article Microservice Registration and Discovery with Spring Cloud and Netflix’s Eureka which shows running a complete microservice system on Cloud Foundry.
The Spring Cloud projects are here.
Follow Up 2: SpringOne Platform 2018
Book your place at SpringOne2 Platform in Washington DC, USA this September - simply the best opportunity to find out first hand all that’s going on and to provide direct feedback. The name has changed, from Spring One, to reflect the growth of Spring in platform services (such as the Spring Cloud projects).
Updates (June 2018)
A number of changes since I originally wrote this blog:
- A discussion of using multiple instances of the same service on the same host.. Demo application updated to match.
- A discussion of
@LoadBalanced- how this works has changed since the Brixton release-train (Spring Cloud 1.1.0.RELEASE). - Refactored configuration of Accounts microservice into its own class
AccountsConfiguration. - Upgraded to Spring Boot 2, so a few Boot classes have changed package.
- Upgraded demo application to Spring Cloud Finchley release-train (including various fixes from the comments at the end - thanks for the feedback).
- The Eureka server dependency has changed to
spring-cloud-starter-netflix-eureka-server.
Previous version, using Spring Boot 1.5.10 and Spring Cloud Edgeware SR3, is available as git tag v1.2.0.
OK, let’s get started …
Service Registration
When you have multiple processes working together they need to find each other. If you have ever used Java’s RMI mechanism you may recall that it relied on a central registry so that RMI processes could find each other. Microservices has the same requirement.
The developers at Netflix had this problem when building their systems and created a registration server called Eureka (“I have found it” in Greek). Fortunately for us, they made their discovery server open-source and Spring has incorporated into Spring Cloud, making it even easier to run up a Eureka server. Here is the complete discovery-server application:
@SpringBootApplication
@EnableEurekaServer
public class ServiceRegistrationServer {

  public static void main(String[] args) {
    // Tell Boot to look for registration-server.yml
    System.setProperty("spring.config.name", "registration-server");
    SpringApplication.run(ServiceRegistrationServer.class, args);
  }
}
It really is that simple!
Spring Cloud is built on Spring Boot and utilizes parent and starter POMs. The important parts of the POM are:
    <parent>
        <groupId>org.springframework.boot</groupId>
        <artifactId>spring-boot-starter-parent</artifactId>
        <version>2.0.1.RELEASE</version>
    </parent>

    <dependencies>
        <dependency>
            <!-- Setup Spring Boot -->
            <groupId>org.springframework.boot</groupId>
            <artifactId>spring-boot-starter</artifactId>
        </dependency>

        <dependency>
            <!-- Setup Spring MVC & REST, use Embedded Tomcat -->
            <groupId>org.springframework.boot</groupId>
            <artifactId>spring-boot-starter-web</artifactId>
        </dependency>

        <dependency>
            <!-- Spring Cloud starter -->
            <groupId>org.springframework.cloud</groupId>
            <artifactId>spring-cloud-starter</artifactId>
        </dependency>

        <dependency>
            <!-- Eureka for service registration -->
            <groupId>org.springframework.cloud</groupId>
            <artifactId>spring-cloud-starter-eureka-server</artifactId>
        </dependency>
    </dependencies>

   <!-- Spring Cloud dependencies -->
    <dependencyManagement>
        <dependencies>
            <dependency>
                <groupId>org.springframework.cloud</groupId>
                <artifactId>spring-cloud-dependencies</artifactId>
                <version>Finchley.RELEASE</version>
                <type>pom</type>
                <scope>import</scope>
            </dependency>
        </dependencies>
    </dependencyManagement>
This POM has changed since I originally wrote the article to use Spring Boot as its parent not Spring Cloud. Spring Cloud dependencies are provided via the dependency management section.
An sample gradle build file is also included in the github code.
Note: Finchley.RELEASE is the current "release train" - a set of co-ordinated releases -- see note on Spring Cloud home page.
By default Spring Boot applications look for an
application.properties or application.ymlfile for configuration. By setting the spring.config.name property we can tell Spring Boot to look for a different file - useful if you have multiple Spring Boot applications in the same project - as I will do shortly.
This application looks for
registration-server.properties or registration-server.yml. Here is the relevant configuration from registration-server.yml:# Configure this Discovery Server
eureka:
instance:
hostname: localhost
client: # Not a client, don't register with yourself (unless running
# multiple discovery servers for redundancy)
registerWithEureka: false
fetchRegistry: false
server:
port: 1111 # HTTP (Tomcat) port
By default Eureka runs on port 8761, but here we will use port
1111 instead. Also by including the registration code in my process I might be a server or a client. The configuration specifies that I am not a client and stops the server process trying to register with itself.Using Consul
Try running the RegistrationServer now (see below for help on running the application). You can open the Eureka dashboard here: http://localhost:1111 and the section showing Applications will be empty.
From now on we will refer to the discovery-serversince it could be Eureka or Consul (see side panel).
Creating a Microservice: Account-Service
A microservice is a stand-alone process that handles a well-defined requirement.
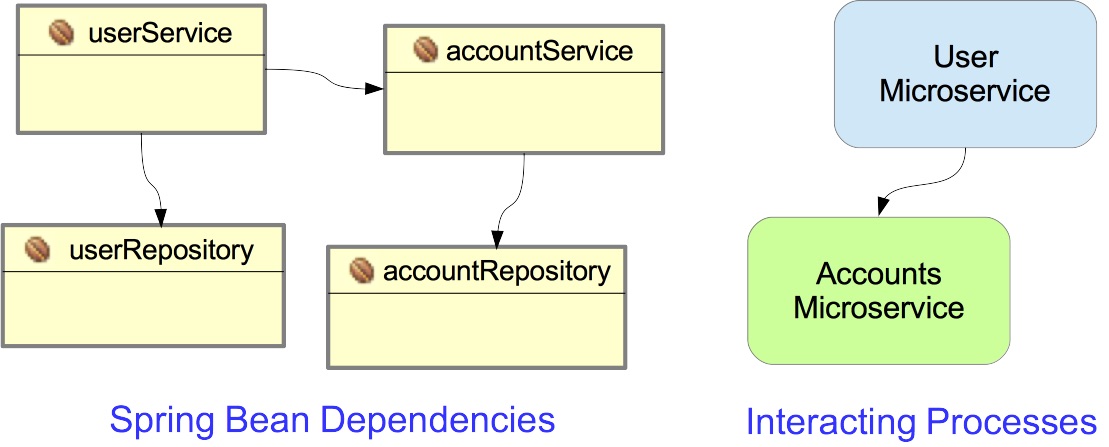
When configuring applications with Spring we emphasize Loose Coupling and Tight Cohesion, These are not new concepts (Larry Constantine is credited with first defining these in the late 1960s - reference) but now we are applying them, not to interacting components (Spring Beans), but to interacting processes.
In this example, I have a simple Account management microservice that uses Spring Data to implement a JPA
AccountRepository and Spring REST to provide a RESTful interface to account information. In most respects this is a straightforward Spring Boot application.
What makes it special is that it registers itself with the discovery-server at start-up. Here is the Spring Boot startup class:
@EnableAutoConfiguration
@EnableDiscoveryClient
@Import(AccountsWebApplication.class)
public class AccountsServer {

    @Autowired
    AccountRepository accountRepository;

    public static void main(String[] args) {
        // Will configure using accounts-server.yml
        System.setProperty("spring.config.name", "accounts-server");

        SpringApplication.run(AccountsServer.class, args);
    }
}
The annotations do the work:
@EnableAutoConfiguration- defines this as a Spring Boot application.@EnableDiscoveryClient- this enables service registration and discovery. In this case, this process registers itself with the discovery-server service using its application name (see below).@Import(AccountsWebApplication.class)- this Java Configuration class sets up everything else (see below for more details).
What makes this a microservice is the registration with the discovery-server via
@EnableDiscoveryClient and its YML configuration completes the setup:# Spring properties
spring:
application:
name: accounts-service
# Discovery Server Access
eureka:
client:
serviceUrl:
defaultZone: http://localhost:1111/eureka/
# HTTP Server
server:
port: 2222 # HTTP (Tomcat) port
Note that this file
- Sets the application name as
accounts-service. This service registers under this name and can also be accessed by this name - see below. - Specifies a custom port to listen on (2222). All my processes are using Tomcat, they can’t all listen on port 8080.
- The URL of the Eureka Service process - from the previous section.

Run the AccountsServiceapplication now and let it finish initializing. Refresh the dashboard http://localhost:1111 and you should see the ACCOUNTS-SERVICE listed under Applications. Registration takes up to 30 seconds (by default) so be patient - check the log output from RegistrationService
Warning: Do not try to display XML output using the internal web-viewer of Eclipse/STS because it cannot do so. Use your favorite web browser instead.
For more detail, go here: http://localhost:1111/eureka/apps/ and you should see something like this:
<applications>
    <versions__delta>1</versions__delta>
    <apps__hashcode>UP_1_</apps__hashcode>
    <application>
        <name>ACCOUNTS-SERVICE</name>
        <instance>
            <hostName>autgchapmp1m1.corp.emc.com</hostName>
            <app>ACCOUNTS-SERVICE</app>
            <ipAddr>172.16.84.1</ipAddr><status>UP</status>
            <overriddenstatus>UNKNOWN</overriddenstatus>
            <port enabled="true">3344</port>
            <securePort enabled="false">443</securePort>
            ...
        </instance>
    </application>
</applications>
Alternatively go to http://localhost:1111/eureka/apps/ACCOUNTS-SERVICE and see just the details for AccountsService - if it’s not registered you will get a 404.
Configuration Options
Registration Time: Registration takes up to 30s because that is the default client refresh time. You can change this by setting the
eureka.instance.leaseRenewalIntervalInSecondsproperty to a smaller number (in the demo application I have set it to 5). This is not recommended in production. See also.eureka:
instance:
leaseRenewalIntervalInSeconds: 5 # DO NOT DO THIS IN PRODUCTION
Registration Id: A process (microservice) registers with the discovery-service using a unique id. If another process registers with the same id, it is treated as a restart (for example some sort of failover or recovery) and the first process registration is discarded. This gives us the fault-tolerant system we desire.
To run multiple instances of the same process (for load-balancing and resilience) they need to register with a unique id. When I first wrote this blog, that was automatic and since the Brixtonrelease-train, it is again.
Under the Angel release train, the instance-id, used by a client to register with a discovery server, was derived from the client’s service name (the same as the Spring application name) and also the client’s host name. The same processes running on the same host would therefore have the same id, so only one could ever register.
Fortunately you could set the id property manually via the client’s Eureka metadata map, like this:
eureka:
  instance:
    metadataMap:
      instanceId: ${spring.application.name}:${spring.application.instance_id:${server.port}}
Since the Brixton release train, this is now the default. So what does it do?
We are setting the
instanceId to application-name:instance_id, but if instance_id is not defined, we will use application-name::server-port instead. Note that the spring.application.instance_id is only set when using Cloud Foundry but it conveniently provides a unique id number for each instance of the same application. We can do something similar when running elsewhere by using the server-port (since different instances on the same machine must listen on different ports. Another example you will often see is ${spring.application.name}:${spring.application.instance_id:${random.value}} but I personally find using the port number makes each instance easy to identify - the random values are just long strings that don’t mean anything.
Note: The syntax
${x:${y}} is Spring property shorthand for ${x} != null ? ${x} : ${y}.
Since the Brixton release there is also a dedicated property for this:
eureka:
  instance:
    instanceId: ${spring.application.name}:${spring.application.instance_id:${random.value}}
Accessing the Microservice: Web-Service
To consume a RESTful service, Spring provides the
RestTemplate class. This allows you to send HTTP requests to a RESTful server and fetch data in a number of formats - such as JSON and XML.
Note: The Accounts microservice provides a RESTful interface over HTTP, but any suitable protocol could be used. Messaging using AMQP or JMS is an obvious alternative (in which case the Discovery Server is no longer needed - instead processes need to know the names of the queues to talk to, consider using the Spring Cloud Configuration Server for this).
Encapsulating Microservice Access
Here is part of the
WebAccountService for my client application:@Service
public class WebAccountsService {
@Autowired // NO LONGER auto-created by Spring Cloud (see below)
@LoadBalanced // Explicitly request the load-balanced template
// with Ribbon built-in
protected RestTemplate restTemplate;
protected String serviceUrl;
public WebAccountsService(String serviceUrl) {
this.serviceUrl = serviceUrl.startsWith("http") ?
serviceUrl : "http://" + serviceUrl;
}
public Account getByNumber(String accountNumber) {
Account account = restTemplate.getForObject(serviceUrl
+ "/accounts/{number}", Account.class, accountNumber);
if (account == null)
throw new AccountNotFoundException(accountNumber);
else
return account;
}
...
}
Note that my
WebAccountService is just a wrapper for the RestTemplate fetching data from the microservice. The interesting parts are the serviceUrl and the RestTemplate.Accessing the Microservice
As shown below, the
serviceUrl is provided by the main program to the WebAccountController (which in turn passes it to the WebAccountService):@SpringBootApplication
@EnableDiscoveryClient
@ComponentScan(useDefaultFilters=false) // Disable component scanner
public class WebServer {
// Case insensitive: could also use: http://accounts-service
public static final String ACCOUNTS_SERVICE_URL
= "http://ACCOUNTS-SERVICE";
public static void main(String[] args) {
// Will configure using web-server.yml
System.setProperty("spring.config.name", "web-server");
SpringApplication.run(WebServer.class, args);
}
@LoadBalanced // Make sure to create the load-balanced template
@Bean
RestTemplate restTemplate() {
return new RestTemplate();
}
/**
* Account service calls microservice internally using provided URL.
*/
@Bean
public WebAccountsService accountsService() {
return new WebAccountsService(ACCOUNTS_SERVICE_URL);
}
@Bean
public WebAccountsController accountsController() {
return new WebAccountsController
(accountsService()); // plug in account-service
}
}
A few points to note:
- The
WebControlleris a typical Spring MVC view-based controller returning HTML. The application uses Thymeleaf as the view-technology (for generating dynamic HTML) WebServeris also a@EnableDiscoveryClientbut in this case as well as registering itself with the discovery-server (which is not necessary since it offers no services of its own) it uses Eureka to locate the account service.- The default component-scanner setup inherited from Spring Boot looks for
@Componentclasses and, in this case, finds myWebAccountControllerand tries to create it. However, I want to create it myself, so I disable the scanner like this@ComponentScan(useDefaultFilters=false). - The service-url I am passing to the
WebAccountControlleris the name the service used to register itself with the discovery-server - by default this is the same as thespring.application.namefor the process which isaccount-service- seeaccount-service.ymlabove. The use of upper-case is not required but it does help emphasize that ACCOUNTS-SERVICE is a logical host (that will be obtained via discovery) not an actual host.
Load Balanced RestTemplate
The
RestTemplate bean will be intercepted and auto-configured by Spring Cloud (due to the @LoadBalanced annotation) to use a custom HttpRequestClient that uses Netflix Ribbon to do the microservice lookup. Ribbon is also a load-balancer so if you have multiple instances of a service available, it picks one for you. (Neither Eureka nor Consul on their own perform load-balancing so we use Ribbon to do it instead).
Note: From the Brixton Release Train (Spring Cloud 1.1.0.RELEASE), the RestTemplate is no longer created automatically. Originally it was created for you, which caused confusion and potential conflicts (sometimes Spring can be too helpful!).
Note that this instance is qualified using
@LoadBalanced. (The annotation is itself annotated with @Qualifier - see here for details). Thus if you have more than one RestTemplate bean, you can make sure to inject the right one, like this: @Autowired
@LoadBalanced // Make sure to inject the load-balanced template
protected RestTemplate restTemplate;
If you look in the RibbonClientHttpRequestFactory you will see this code:
    String serviceId = originalUri.getHost();
    ServiceInstance instance =
             loadBalancer.choose(serviceId);  // loadBalancer uses Ribbon
    ... if instance non-null (service exists) ...
    URI uri = loadBalancer.reconstructURI(instance, originalUri);
The
loadBalancer takes the logical service-name (as registered with the discovery-server) and converts it to the actual hostname of the chosen microservice.
A
RestTemplate instance is thread-safe and can be used to access any number of services in different parts of your application (for example, I might have a CustomerService wrapping the same RestTemplate instance accessing a customer data microservice).Configuration
Below the relevant configuration from
web-server.yml. It is used to:- Set the application name
- Define the URL for accessing the discovery server
- Set the Tomcat port to 3333
# Spring Properties
spring:
  application:
     name: web-service

# Discovery Server Access
eureka:
  client:
    serviceUrl:
      defaultZone: http://localhost:1111/eureka/

# HTTP Server
server:
  port: 3333   # HTTP (Tomcat) port
How to Run the Demo
A small demo of this system is at http://github.com/paulc4/microservices-demo. Clone it and either load into your favorite IDE or use maven directly. Suggestions on how to run the demo are included in the README on the project homepage.
Extra Notes
Some notes about Spring Boot usage by these applications. If you are not familiar with Spring Boot, this explains some of the “magic”!
View Templating Engines
The Eureka dashboard (inside
RegistrationServer) is implemented using FreeMarker templates but the other two applications use Thymeleaf. To make sure each uses the right view engine, there is extra configuration in each YML file.
This is at the end of
registration-server.yml to disable Thymeleaf....
# Discovery Server Dashboard uses FreeMarker. Don't want Thymeleaf templates
spring:
thymeleaf:
enabled: false # Disable Thymeleaf spring:
Since both
AccountService and WebService use thymeleaf, we also need to point each at their own templates. Here is part of account-server.yml:# Spring properties
spring:
application:
name: accounts-service # Service registers under this name
freemarker:
enabled: false # Ignore Eureka dashboard FreeMarker templates
thymeleaf:
cache: false # Allow Thymeleaf templates to be reloaded at runtime
prefix: classpath:/accounts-server/templates/
# Template location for this application only
...web-server.yml is similar but its templates are defined by prefix: classpath:/web-server/templates/
Note the / on the end of each
spring.thymeleaf.prefix classpath - this is crucial.Command-Line Execution
The jar is compiled to automatically run
io.pivotal.microservices.services.Main when invoked from the command-line - see Main.java.
The Spring Boot option to set the
start-class can be seen in the POM: <properties>
<!-- Stand-alone RESTFul application for testing only -->
<start-class>io.pivotal.microservices.services.Main</start-class>
</properties>AccountsConfiguration class
@SpringBootApplication
@EntityScan("io.pivotal.microservices.accounts")
@EnableJpaRepositories("io.pivotal.microservices.accounts")
@PropertySource("classpath:db-config.properties")
public class AccountsWebApplication {
...
}
This is the main configuration class for AccountService which is a classic Spring Boot application using Spring Data. The annotations do most of the work:
@SpringBootApplication- defines this as a Spring Boot application. This convenient annotation combines@EnableAutoConfiguration,@Configurationand@ComponentScan(which, by default, causes Spring to search the package containing this class, and its sub-packages, for components - potential Spring Beans:AccountControllerandAccountRepository) .@EntityScan("io.pivotal.microservices.accounts")- because I am using JPA, I need to specify where the@Entityclasses are. Normally this is an option you specify in JPA’spersistence.xmlor when creating aLocalContainerEntityManagerFactoryBean. Spring Boot will create this factory-bean for me because thespring-boot-starter-data-jpadependency is on the class path. So an alternative way of specifying where to find the@Entityclasses is by using@EntityScan. This will findAccount.@EnableJpaRepositories("io.pivotal.microservices.accounts")- look for classes extending Spring Data’sRepositorymarker interface and automatically implement them using JPA - see Spring Data JPA.@PropertySource("classpath:db-config.properties")- properties to configure myDataSource– see db-config.properties.
Configuring Properties
As mentioned above, Spring Boot applications look for either
application.properties or application.yml to configure themselves. Since all three servers used in this application are in the same project, they would automatically use the same configuration.
To avoid that, each specifies an alternative file by setting the
spring.config.name property.
For example here is part of
WebServer.java.public static void main(String[] args) {
// Tell server to look for web-server.properties or web-server.yml
System.setProperty("spring.config.name", "web-server");
SpringApplication.run(WebServer.class, args);
}
At runtime, the application will find and use
web-server.yml in src/main/resources.Logging
Spring Boot sets up INFO level logging for Spring by default. Since we need to examine the logs for evidence of our microservices working, I have raised the level to WARN to reduce the amount of logging.
To do this, the logging level would need to be specified in each of the
xxxx-server.ymlconfiguration files. This is usually the best place to define them as logging properties cannotbe specified in property files (logging has already been initialized before @PropertySource directives are processed). There is a note on this in the Spring Boot manual, but it’s easy to miss.
Rather than duplicate the logging configuration in each YAML file, I instead opted to put it in the logback configuration file, since Spring Boot uses logback - see src/main/resources/logback.xml. All three services will share the same logback.xml
Microservices Implementation in Java
Microservices is a synonym for Service Oriented Architectural (SOA) style of constructing aggregation of many small loosely coupled services. When developing microservices with java, you can use several microservices framework. Some of the frameworks are Spring Boot, Jersey, Dropwizard, Play Framework, and Restlet. In this document, we will implement a microservice “authenticate” with Spring Boot. Spring Boot is the best and most used Microservice framework since long.
The advantage of Spring Boot is that it has a vast infrastructure and has many spring projects working along. To create microservices with Spring Boot, you need to follow below mentioned 3 steps:
- Setup new service
- Expose the resource using RestController
- Consume the service resource with RestTemplate
Here, we are going to create 3 different microservices. First microservice is Discovery Server which is a Eureka server. Second microservice is Authentication Service which is Producer service and Third microservice is Consumer service which is discovery client. This microservice can find other microservices using its RestTemplate. Let’s start with developing these three microservices.
Developing Discovery Server
Service Discovery is used so that microservices can find each other. We use Eureka for our service discovery. Eureka, created by Netflix, provides service discovery with Spring Cloud. Folder Structure for Discovery server is as below: Maven Dependency:
 Maven Dependency:
Application.yml:
To run Eureka registry service is easy, just define @EnableEurekaServer annotation to spring boot application.
After running this microservice, following output is available on localhost:9000: 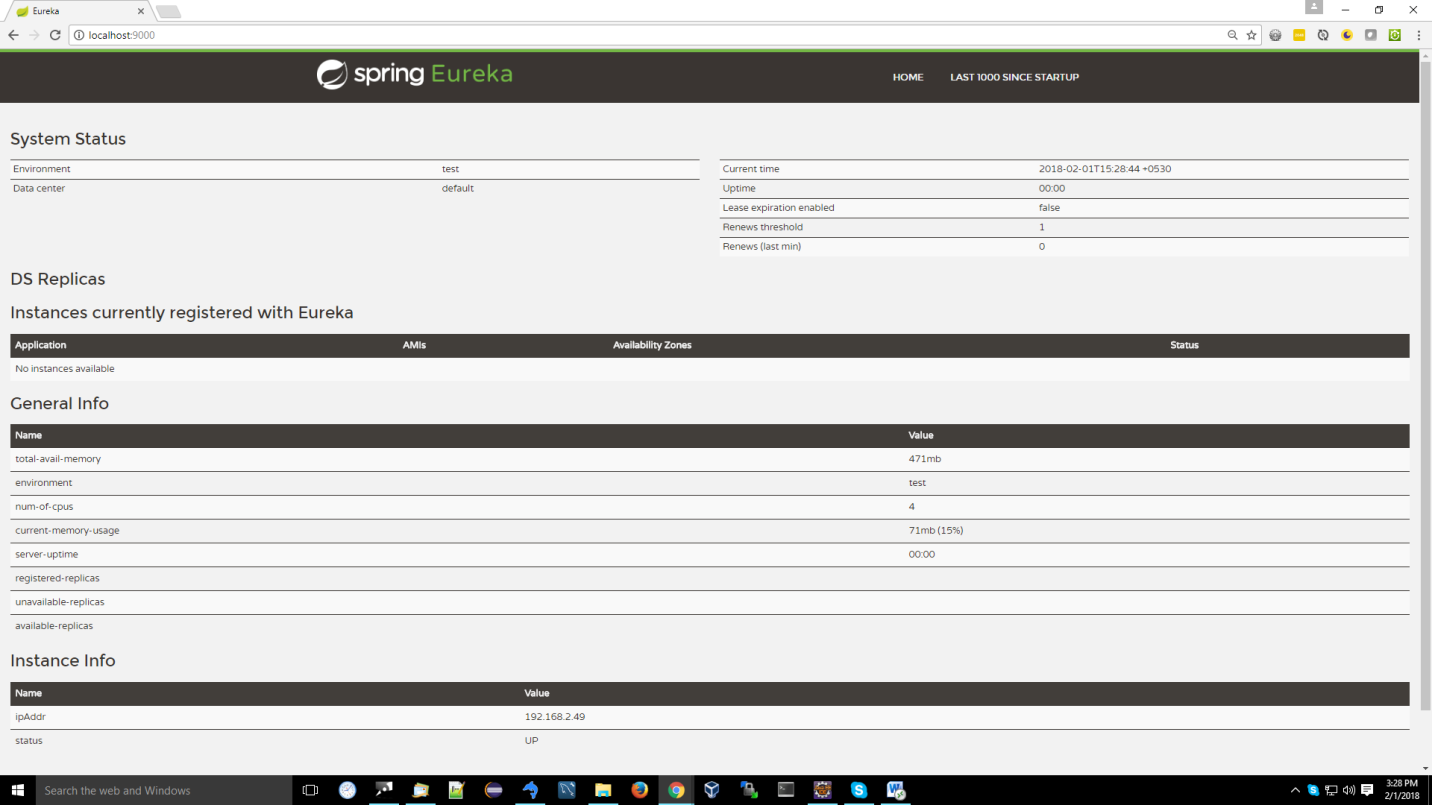 Here in the application section of the image, there is no instance currently available with Eureka. After running Producer and Consumer microservice, we will able to see the instances in the Application section.
 Here in the application section of the image, there is no instance currently available with Eureka. After running Producer and Consumer microservice, we will able to see the instances in the Application section.
Developing Authentication Service
In this, we will create Login and Registration methods. We will use Spring Data JPA for querying MySQL database using method name convention. You can learn spring data JPA from this site: https://docs.spring.io/spring-data/jpa/docs/current/reference/html/. Also in this, we will be hashing the password using Spring Security’s BCrypt algorithm. Folder Structure for Authentication service is as below: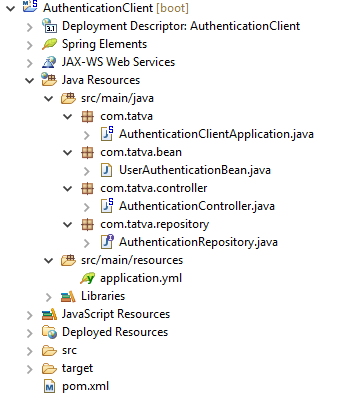 Maven Dependency:
 Maven Dependency:
Application.yml:
To define this microservice as Discovery Client, we need to include @EnableDiscoveryClient annotation to application.
We will create AuthenticationRepository to querying the database using JPA. To expose Authentication service, we use RestController. In the controller, @CrossOrigin annotation is used to pass data or get data from cross platforms like Angular.
After running this microservice, you can fire rest call to this service on localhost:9001. Also, instance of this service gets registered in eureka server which is already running on localhost:9000.
Developing Consumer Service
In this service, we will use RestTemplate to consume the remote service resource. Also we use Spring Cloud’s Netflix support for load balancing. Load balancing is used to decide which service instance to use. Netflix Ribbon provides several algorithms for client-side load balancing. Folder Structure for Consumer service is as below: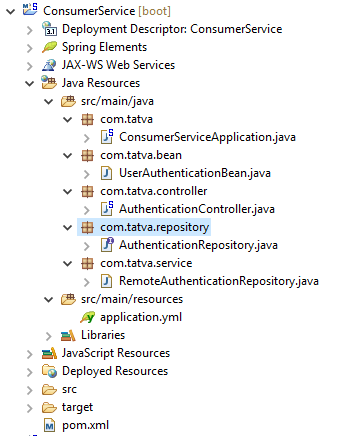 Maven Dependency:
 Maven Dependency:
Application.yml:
You need to include RemoteRepository bean and RestTemplate bean in main application, so that this microservice can consume other microservices.
RemoteRepository will pass the HTTP request to the given Service URL and get the response from the remote service.
After running this service on localhost:8081, you can fire HTTP request from client side and request to this service will be passed to producer microservice, in our scenario Authentication service. Also, you will be able to see instance of this microservice in Eureka server on localhost:9000 as below: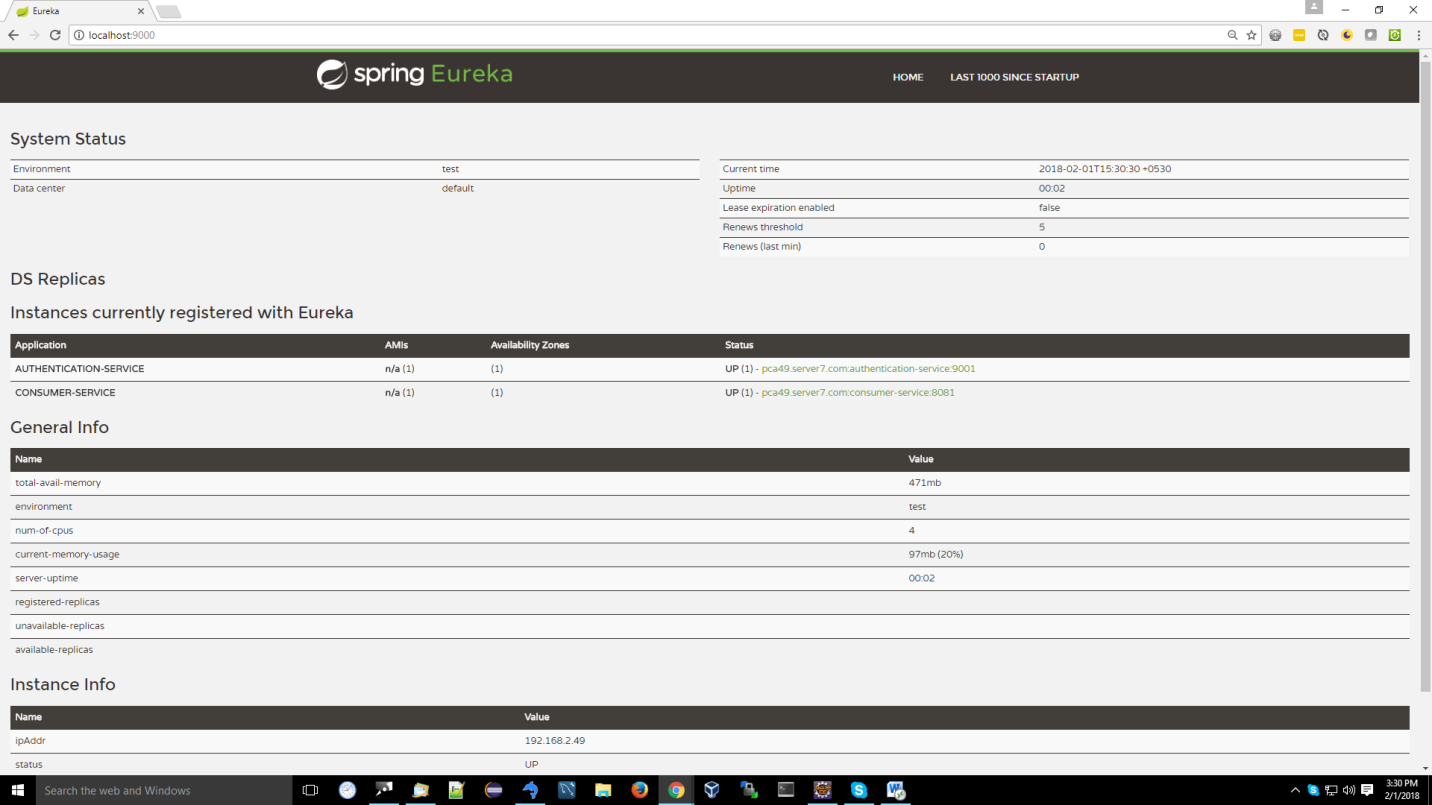 To summarize, we understand about using microservices with Spring Boot. Also we learned some information on Eureka server and Netflix Ribbon for discovery service and Load balancing. You can learn more about microservices with spring from site: https://spring.io/blog/2015/07/14/microservices-with-spring
 To summarize, we understand about using microservices with Spring Boot. Also we learned some information on Eureka server and Netflix Ribbon for discovery service and Load balancing. You can learn more about microservices with spring from site: https://spring.io/blog/2015/07/14/microservices-with-spring
****************************END OF INTRODUCTION ******************************************
No comments:
Post a Comment